
Whether you’ve grown to do without it or are still craving it, gluten-free keto bread is one food item we may have given up making ourselves. Sure, there are a lot more keto recipes out there (and many store-bought options still contain gluten). And, if we’re looking for something a bit more traditional in flavor or texture, the options become more limited when some of us have a history of hormone-based cancer and conditions. These cancers and conditions include ovarian, breast, endometrial, and uterine cancers, as well as uterine fibroids, infertility, endometriosis, and others for which many of us may be more cautious about consuming phytoestrogens, such as flax and chia seeds, coffee, soy, and even some berries. I personally choose to eat the ones that have a high antioxidant benefit, such as berries and matcha, and limit others. (*See the article note below.)
For these reasons, making a homemade, grain, flax, and chia seed-free keto bread has become a seasonal item in our household. I use it for my annual Thanksgiving stuffing, which I absolutely love! You can hardly notice the difference between the traditional and grain-free, low-carb version I make. (Although, the baker in the family might have something to say of the extra work involved in making it, drying the croutons, and then making the stuffing.) However, if you’re into a morning breakfast sandwich or a pretty avocado toast, I suppose keto bread making can become a more regular occurrence.
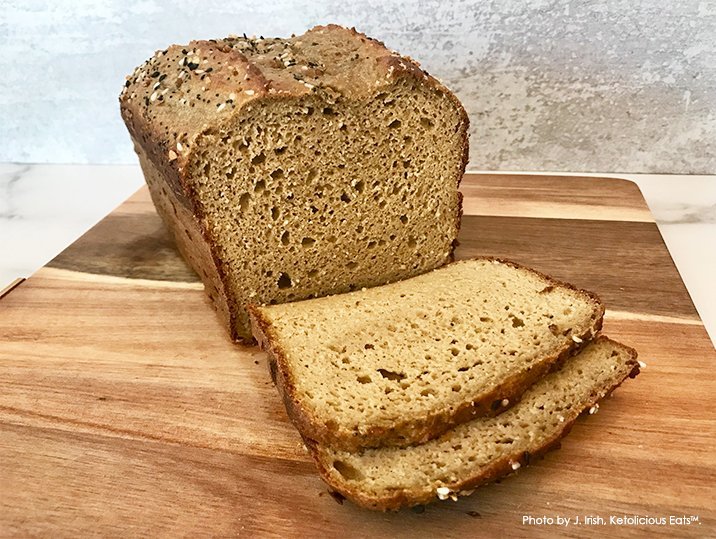
In case you haven’t made or eaten a homemade grain-free bread, they are often best toasted. Due to the limited ability of grain-free breads to keep a rise, this also limits their ability to bake evenly toward the center of the bread loaf, making the slices a little more wet and very slightly spongy in texture than conventional bread loaves.
*Note: The research on phytoestrogens has mixed opinions from practitioners on whether they prevent cancers or tip others of us further into an estrogen-dominant state. See this article from Ann Arbor Holistic Health on xenoestrogens, phytoestrogens, and the possible risk for estrogen dominance, its symptoms, and hypothyroidism.
This recipe was last updated on 4/12/2022 to alter baking temperatures and increase the water ingredient from 1/4 cup to 1 cup, removing the 3/4 cup plain unsweetened almond or coconut milk. This simplifies the recipe and gives the bread slices a slightly less “wet” feel after baking or toasting. Directions have also been simplified.

Grain + Gluten-Free Keto Bread
20
slices30
minutes1
hour15
minutesWhether you’re craving the occasional PB+J sandwich or looking to go all out on your next gluten-free (and phytoestrogen-free) Thanksgiving stuffing, hold onto my recipe for a tasty fix in your grain-free kitchen.
Approximate macros for each 3/8″ slice (not including any seasoning toppings), using the Fat Daddios loaf pan as indicated below: 167 calories | 4.9g protein | 2.7g net carbs | 12.5g fat
Ingredients
1 cup filtered water
6 large pasture-raised eggs (I like mine to come to room temperature after refrigeration for consistent baking times)
1/3 cup pasture-raised ghee (or butter), butter-flavored coconut oil, or sustainably-sourced palm oil, melted
1/4 cup yacon syrup* (or honey for paleo) I actually like to use a half/half mixture of organic honey and Inca Yacon Syrup (it has the least amount of net carbs) to get a nicer golden color in the bread.
1 tablespoon apple cider vinegar
2-1/4 cup almond flour
5 tablespoons coconut flour
3 tablespoons pyllium husk powder
3/4 teaspoon Himalayan pink salt
2 teaspoons baking powder
1/2 teaspoon baking soda
Optional: olive oil, pink salt, dried rosemary, Everything Bagel Seasoning, or other toppings to sprinkle over the top of the bread batter when baking (optional)
- Supplies
2 medium-sized mixing bowls
1 bread or loaf pan (I like Fat Daddios smaller bread pans, as gluten-free breads have a hard time baking the batter through the middle portion of the pan.)
1 tall (approximately 1-inch) oven-safe pan for a water bath
1 hand mixer
parchment paper to cover the inside of your bread pan and to top the bread later in the baking process
aluminum foil to “tent” the bread as it is baking
Directions
- Preheat the oven to 400 degrees Fahrenheit, use the convection setting if you have it.
- Now, put your water bath container with about 1/2-inch of water in it, and set it onto the middle baking rack with enough clearance above it for a 2-inch rise above your baking pan.
- Then, line all four sides of the bread pan with parchment paper so that the long sides are overlapped with about 2 inches of parchment. (You will use these long side ends to pull the bread out of the pan once it has cooled.)
- Combine the dry ingredients into a medium-sized mixing bowl, and mix well so any clumps are removed.
- Then, add the melted butter/ghee, butter-flavored coconut oil or palm oil, water, apple cider vinegar, and yacon syrup or honey (for paleo) to a medium-sized mixing bowl. Mix ingredients well with a spatula.
- Next, add the eggs to the wet ingredients, and beat with a hand mixer until well blended. Note: If you’re not accustomed to cracking eggs open, you may consider breaking them into a small bowl first, in case you need to collect pieces of broken shells. Or, you may crack them into your dry ingredients instead. Trust me. It’s much easier to fish egg shell pieces out of a small bowl or dry ingredients than a dark mixture of wet ingredients.
- Now, carefully spoon your dry ingredients into the wet ingredients, and continue mixing until the batter has a consistent texture. The batter should appear thicker than a pancake batter, with a sticky consistency to it.
- Next, carefully pour and/or scoop out your batter into the lined bread pan so that it evenly fills the pan (without large bubbles), leaving the parchment standing upright and pretty clean of batter. (Any batter left on the parchment paper during baking will burn.) I like to leave a 1/2-inch trough down the center of the batter-filled pan to allow the inner center to get as much rise as possible. This will allow the middle of the bread to bake more evenly. You may also add, at this time, any topical seasonings, such as Everything Bagel Seasoning (my personal preference), prior to putting the dough pan in the oven.
- Once the batter is evenly distributed in the baking pan, carefully set it into the center of the water bath in the oven. Then set the over timer to 15 minutes. When the buzzer goes off, turn the oven heat down to 350 degrees Fahrenheit, using the convection setting if you have it. Your bread should have risen about 1-1/2 inches at this point and begin smelling like bread.
Next, carefully pull out the rack that the water bath container is on, and make one long 1-1/2-inch deep slit with a knife (lengthwise) down the center of the rising loaf. This crevice will help continue baking the center of the bread batter more evenly. Add more seasoning(s) down the center where you made the slit, if you added some earlier. - Now, tent your bread with aluminum foil. I like to take a rectangular cut of aluminum foil that’ll entirely cover the top of the bread loaf AND allow me to fold down the edges to create a 1-inch long side. At the four corners of the aluminum tent, I’ll also crease the aluminum together to give it more of a sturdy shape. Tenting the bread fairly close to the pan will help protect the top and sides from not overly browning or becoming hard and crusty.
- Bake for roughly 40 minutes more, and then carefully remove it from the oven with oven mitts. Your bread will likely have risen to about 2 inches. Now, re-cut that slit you made down the center of the batter, and re-tent it.
- Bake for another 20 to 25 minutes, and you should have a pretty evenly baked loaf of keto or paleo bread. Feel free to poke a long chop stick or a long skewer in the center of the bread to insure that the bread is done. Your chop stick or skewer should come out clean, if it’s done. If it isn’t, re-tent and bake for another 10 minutes, and recheck.
- When the bread is done, set it on the countertop, and allow it to cool for 10 minutes before using the long sides of the parchment to remove the bread from your baking pan. You can leave the bread sitting on the parchment, with the sides down, to allow it to cool completely (about 2 to 3 hours). Your bread will deflate about 1-inch during this process.
- Once your bread has completely cooled inside and out, feel free to enjoy a 3/8-inch slice by itself, toasted, or wrap the whole loaf in parchment paper and store in an air-tight container in the refrigerator. The bread can be stored for about two weeks.
Notes
- * Yacon syrup is a fairly pricey low-glycemic ingredient that can differ in color, taste, viscosity, and net carbs between various brands. Some tend to have a golden color and thinner viscosity like honey, while others have a deeper greenish-brown color (and thickness) like that of molasses.
- If you plan on making croutons for a Thanksgiving stuffing, I recommend using a pre-seasoned 12″ cast iron skillet for quick, even baking and making the bread several days in advance of your event. To do this, preheat your oven to 350 degrees. Then, melt 2 tablespoons of butter-flavored coconut oil or palm oil in the skillet on medium low heat, and carefully swirl it around inside and along the sides of the skillet. Then, pour in your batter, and bake for about 20 minutes until you get a golden brown top. You can do the toothpick test to ensure the center is baked, and then remove it from the oven. Allow it to cool in the skillet for about 15 minutes before flipping it out onto a 12″ x 17″ (or other adequate size) cooling rack. Continue allowing it to cool before cutting it into 1/2″ strips or cubes. You may decide to let it dry out completely covered with parchment or aluminum foil or set the cooling rack, with the drying croutons, onto a large baking sheet, and bake at 200 degrees for about 3 hours in the center of the oven. This will allow the croutons to dry out. When removed and allowed to cool, you can store your croutons in a Ziplock bag or air-tight container until you’re ready to make your homemade stuffing.
Did you make this recipe?
Tag @ketoliciouseats on Instagram and hashtag it #ketoliciouseats
Like this recipe?
Follow us @ketoliciouseats on Pinterest
Did you make this recipe?
Follow us on Facebook
