
Warning: Undefined variable $attachment in /home/u658337025/domains/liveandeatclean.com/public_html/wp-content/plugins/recipe-card-blocks-by-wpzoom-pro/src/structured-data-blocks/class-wpzoom-premium-recipe-card-block.php on line 1742
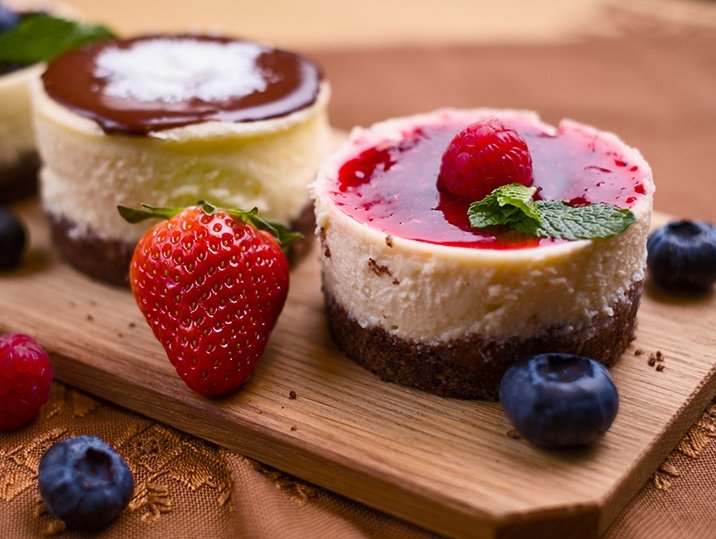
Red and white–so simple and striking in color contrast–adorns timeless motifs in everything from logos to a festive array of desserts. Classic red berries on a creamy white cheesecake never tire in photographs, varying in how a bright glaze is delicately drizzled across a plate to the berries themselves being placed in varying ways on this cake of sorts. (In fact, The Cheesecake Factory shares that it’s most popular cheesecake for over 35 years has been the one topped in brightly colored red strawberries!) Even when we begin to mix the colors up in this dessert, such as adding blueberries, we seem to be just as happy with a triadic color of flavors—bright red raspberries, dark blue blueberries, and a yellowish cream cake.
Side tangent… Did you know cheesecake has been around for over a millennium? It is believed that it originated out of Greece. It was fed to athletes in the Olympics and to guests of weddings. Oh, how far we’ve come! This time-honored dessert still doesn’t disappoint for special occasions and holidays when we can make cheesecake as simple as adding just fresh-squeezed lemon juice in the spring to adding pumpkin puree and fall spices for Thanksgiving. (You can find my Pumpkin Pie Cheesecake recipe here.) I’ve made cheesecake for special occasions with my mom in so many ways in the past, with and without sour cream, lemon juice, condensed milk, more or less cream cheese, and with additional egg yolks. And, let it be known that I simply do not believe one can go wrong in making a cheesecake, unless you burn it in baking! It’s quite forgiving, as far as ingredient make up is concerned. Surprisingly, however, the only cheesecake style I haven’t made–not to include the long list of flavor varieties–is a no-bake, eggless cheesecake. Lol.
For those of us suffering from lactose intolerance (over 70% of the population is lactose intolerant, according to one source I used in a previous Instagram post), I tend to limit dairy, in general, to organic, pasture-raised hard cheeses, raw when possible without ultra pasteurization, lactose-free cream spreads, and very little of the liquid-based type creams, even if pasture-raised.
Today, I thought I’d share a simple recipe, using ratios that I think may be easy for you to remember the next time you have a special occasion to make this dessert for an intimate party. For every one block of cream cheese, I use:
- 1/3 cup, or little more, 2:1 ratio monk fruit blend confectioner’s sweetener
- 1/4 to 1/3 cup organic pasture-raised heavy cream
- 1 teaspoon of fresh-squeezed lemon juice
- 1 teaspoon of vanilla extract
- 1 egg
- 1 egg yolk
- a dash of pink salt
And why the 2:1 ratio sweetener? I’ve used the 1:1 ratio sweetener before, and you have to use an awful lot of it to make it sweet enough, in additional to getting a grainy texture (erythritol has a tendency to do that unless it’s cooked down with liquid). And, too much 1:1 ratio monk fruit sweetener will make the batter too thick for baking. (You’ll notice more cracks in the top when baking.) I use this same 2:1 confectioner’s for making frosting, as it creates the right consistency for piping onto the cupcakes that I sell at the bake shop.
Okay, so let’s get to how I make a cheesecake. More often than not, I tend to more of a New York-style cheesecake. It uses less heavy cream and does not use sour cream. And, as a rule of thumb, I try to use these proportions for every one block of cream cheese, with the exception of sweetener. These ratios make cheesecake making easy to remember. The one thing to consider about sweetener, is your other sweetened toppings. If you add an overly sweet topping and a really sweet cheesecake filling, you get a WHOLE LOT of sweet so I usually make one less sweet than the other.
If you get a chance to use to use my recipe, please consider sharing a review. It takes time to write each and every post until I can afford to hire someone else to do them for me, and your review means the world (of encouragement) to continue sharing my low-carb and keto recipes I use with my own family!
All the best, Jacqueline

Easy Versatile New York-Style Keto Cheesecake
4 – 8
servings20
minutes1
hour40
minutesCelebrate your next intimate occasion with a classic, colorful favorite, with either four individual 3-inch sized or a larger 6 inch-diameter cheesecake (typically my preference) topped in a fruit-based glaze, with or without the cocoa-infused crust!
Ingredients
- Pecan or Walnut-Based Crust*
1/2 cup raw pecans or walnuts (note, however, pecans are sweeter), chopped
1/4 cup almond flour
1/8 cup pasture-raised butter (I like Organic Valley, Kerry Gold, or Organic Pastures (Organic Pastures is raw, unpasteurized
butter, but the most expensive), lactose-free ghee or butter-flavored coconut oil, melted down1/2 tablespoon 1:1 ratio non-GMO monk fruit sweetener
2-1/2 teaspoons organic cocoa powder (optional), if you like a less nutty-flavored cheesecake, as shown in the photo
- 6” Cheesecake (use half these cheesecake ingredients for four 3″ minis as pictured)
2 blocks Organic Valley pasture-raised cream cheese
2/3 cup 2:1 ratio non-GMO monk fruit confectioners’ sweetener, amount used depends on how sweet the toppings are
2 organic pasture-raised eggs
2 organic pasture-raised egg yolks
1/2 to 2/3 cup Organic Valley or Streus Family Farms pasture-raised heavy cream (The Streus Family Farms brand is not ultra-pasteurized.)
2 teaspoons fresh-squeezed lemon juice
2 pinches Himalayan pink salt
- Fruit Glaze
12 to 16 ounces (1 pint) fresh organic fruit (keto-friendly berries: raspberries, blueberries or strawberries)
1/2 cup filtered water (more can be added, if after refrigerated, the glaze becomes too thick)
1/2 to 5/8 cup 1:1 ratio non-GMO monk fruit blend sweetener, amount depends on the sweetness of the fruit and sweetness desired
2 teaspoons vanila extract
1 teaspoon organic fresh-squeezed lemon juice, optional, if you don’t have any
1/2 to 3/4 teaspoons non-GMO glucomannan (prebiotic, gut-healthy thickener that creates a gel-like quality); amount varies for the desired glaze thickness
1 dash Himalayan pink salt
- Supplies
1 6” diameter spring form cake pan (I use the Fat Daddio brand with a raised bottom that can easily be submerged in a 1/2″ to 3/4″ water bath while baking or used as serving plate; OR use four 3″ Fat Daddio round, push-up style cheesecake pans
3 sheets 8” x 6” cut parchment for 6″ baking pans, or smaller cuts of parchment for 3″ cheesecake pans. (I cut mine from 16” x 12” pre-cut baking sheets). The parchment will help with easier removal from the pan. Plus, if you’re weary about food touching/baking in an aluminum-based pan, as I am, this solves that problem.
1 9” x 13” casserole dish for a water bath (in a conventional oven) for a 6″ cake form pan, or a smaller baking dish will work if you’re using your convection toaster oven for baking the cheesecake in 3″ pop-up pans.
1 medium-sized mixing bowl (I like sets that come with tops; they’re handy for making a batter in advance and setting it in the refrigerator until you’re nearly ready to bake. Do allow it to come to room temperature, if you do, so it does not require extra baking time in the oven.)
12 or 16 ounce OXO Good Grips Chef’s Squeeze Bottle, optional if you choose to glaze your cheesecake with a “jam” from a squeeze bottle to make various designs
Directions
- Nut-Based Crust
- Get your cut parchment paper out, and cut to specified sizes to fit your baking pans, if you haven’t done so already. I tend to lay two 8″ x 6″ sheets centered on the bottom of the spring-form pan, and then attach and tighten the top spring-form part around the bottom of the pan. Next, trim off the excess parchment paper so that what is sticking out is cut along the bottom perimeter of the pan. (See photo below.)

- Then, I take the other 8″ x 6″ sheet, and I fold it in half, lengthwise. Do this on both sides of the parchment to get a nice crease. Next, tear by hand along the crease, and fit each piece into the sides of the spring form pan, and then tighten the spring-form top round the bottom part of the pan. You may want to make sure any parchment paper creases on the inside of your pan sit fairly flat (or folded nicely) so not to create odd creases in your cake upon removal of the parchment. (Do the same with the 3″ pans, doing your best to cut enough parchment to cover the bottom and vertical sides of the pans. This is a little more tricky with the smaller pans.)
- Preheat your conventional oven to 325 degrees Fahrenheit.
Note: When I make a small 6″ cheesecake or the smaller sizes, I tend to bake the crust entirely in a convection toaster oven to save energy, but that usually requires placing the cake pan on the bottom rack and reducing the oven temperature about 25 degrees and/or removing the baked crust a few minutes earlier than I would if using a conventional oven. - In a small food processor, add the chopped nuts, almond flour, melted butter, ghee or butter-flavored coconut oil, sweetener, and optional cocoa powder, if you’re not fond of a nutty flavor in your crust. Use the “Chop” setting on your food processor to process the mixture until it is uniform in texture and the ingredients are well mixed.
- Now, spoon in your nut-based crust, and flatten into the bottom of your spring-form 6″ pan four push-up style pans, if using the 3″ sizes. (Filling the smaller 3″ pans are a little harder to work with because of their size, but it’s up to you, if you want to use these versus a larger 6″ pan to serve two people with leftovers or a small dinner party.)
- Bake in your conventional or convection toaster oven for about 10 to 12 minutes, until lightly browned on top. Note: If you make a crust in a convection toaster oven, you will often need to set the timer for a shorter period of time and/or reduce the temperature about 25 degrees so the crust does over bake or burn.
- When done, remove from the oven and allow the pan to cool before adding the cheesecake mix. Or, you may refrigerate it until you are ready to add the cheesecake mixture and bake it. (I like to either bake the crust or make the cheesecake mixture the night before so the process isn’t done all in one day.)
- Fruit Glaze (Optional)
- After you have washed your berries, add them to a small sauce pan, and add the water and sweetener, 1/4 cup at a time. I recommend tasting the fruit glaze as you add sweetener(s) to insure you don’t over or under sweeten the glaze. Depending on the berries you use, you may find that a strawberry glaze needs more sweetener and a blueberry glaze needs less, depending on when berries are picked in the picking season.
- Cook on medium low, until the fruit becomes tender but not completely broken apart. Then add the glucomannan thickener, and mix well. The fruit will change color slightly as it cooks.
- When well mixed, cover with a top and refrigerate for several hours before topping onto your cheesecake. Or, you may put the cold glaze into a food processor to make a jam-like topping that you can sqeeze out from a 12 to 16 ounce squeeze bottle to make pretty hashmarks or other designs, using the smaller or larger squeeze bottle top.
I tend to add fresh berries as a garnish when serving to give each plate a pop of color. Fresh fruit tends to be much brighter than when lightly heated to make a glaze. If you’d like to do this, set aside a handful of fresh fruit that you may wash and cut up for topping. - Cheesecake
- Preheat a conventional oven to 325 degrees or a convection-based toaster oven to 300 degrees, if your water bath container fits in your toaster oven as mine does.
- In a medium-sized mixed bowl, add softened cream cheese block, and remaining ingredients.
- Use a hand mixer (on a high setting) to mix ingredients until the lumps from the cream cheese are nearly gone. The softer the cream cheese the better.
- When the batter is thoroughly mixed, use a spatula to carefully spoon the batter into the baking pan without moving the parchment paper sides too much. Using your spatula, make sure the batter is spread out evenly in your baking pan. (If you use 1-1/2 blocks of cream cheese in your batter, you should have about 1″ of space left between the top of the batter to the top of the baking pan.
If you use 2 blocks of cream cheese (doubling the remaining ingredients) for a slightly taller cheesecake, the top of the cheesecake batter should leave about 1/2″ from the top of the batter to the top of the baking pan. This is the maximum amount of batter I would use in the 6″ baking pans so you have room let for the batter to rise. - Now, put your baking dish into your casserole dish, and add enough water so that you get about 1/2″ to 3/4″ of standing water around your baking dish. This will allow the cheesecake to rise evenly. If you do not use a water bath, the perimeter edges of the cheesecake will rise faster than the center, and not look as pretty when topping with your fruit glaze.
- Bake for roughly 60 minutes for four 3″ cheesecakes or about 125 minutes for a 6″ cheesecake. The top of the cheesecake will be slightly browned and the cheesecake will jiggle some upon moving the pan and otherwise be pretty firm when done. If it is not done, it will jiggle more like liquid than a jello. Note: The cheesecake will rise about 1″ during baking and then fall when cooling.
- When the cheesecake is done, allow to cool completely before refrigerating with the spring form top still attached. I find that for the taller cheesecakes (more than 2″ tall) the sides will bulge out when the cake is still warm so keeping the spring form top on for several hours while it cools (and hardens) in the refrigerator will allow it to keep its shape.
- After the cheesecake has chilled, top with fresh fruit or the (fruit) glaze of choice, and enjoy!
Notes
- Using 1 block of cream cheese and the remaining ingredients will create roughly 1-1/2″ tall 3-inch wide cheesecakes, including crust; 1-1/2 blocks of cream cheese and proportional remaining ingredients will create roughly a 1-3/4″ tall 6-inch cheesecake, including crust; and 2 blocks of cream cheese and proportional remaining ingredients will create a 2″ tall 6-inch cheesecake, including the crust. When making a 9″ wide cheesecake, I tend to triple the recipe (using up to 3 blocks of cream cheese), with the exception of the sweetener so I can taste the batter as I add sweetener(s). I want to ensure I don’t over sweeten the batter with too much erythritol. Otherwise, it will bring on an aftertaste or a cold sensation on the tongue. Because of this, I recommend blending sweeteners whenever possible.
- I recommend using clean, organic or non-GMO ingredients whenever possible.
Did you make this recipe?
Tag @ketoliciouseats on Instagram and hashtag it #ketoliciouseats
Like this recipe?
Follow us @ketoliciouseats on Pinterest
Did you make this recipe?
Follow us on Facebook